| * VH Audio * |
DIY Cat5 Speaker Cables by Chris VenHaus |
|
Photography Pages My Landscape Photo
Gallery
Audiophile Pages My Stereo System
Reviews of My DIY Cables DIY AC Mains Power Cables DIY Cat5 Speaker Cable DIY Fine Silver Interconnects DIY AES/EBU Digital Cable VH Audio (Cables & Parts) V-Cap Audio Capacitors Audio Related Books VH Audio product summary Photography Pages My Landscape Photo
Gallery
Audiophile Pages My Stereo System
Reviews of My DIY Cables DIY AC Mains Power Cables DIY Cat5 Speaker Cable DIY Fine Silver Interconnects DIY AES/EBU Digital Cable VH Audio (Cables & Parts) V-Cap Audio Capacitors Audio Related Books VH Audio product summary
|
This all started back in 1995 when I read a letter published in SpeakerBuilder extolling the virtues of using Cat5 network as high-end speaker cable. I bought a 1000 ft. spool and spent over 1 year tinkering around with different configurations to best optimize the use of this cable for high-end audio. After countless hours (and blisters on my fingers), this construction was found to be the most ideal. In direct side-by-side comparisons I found this cable to be sonically better than Audioquest Midnight, Straightwire Maestros, and even equal to or better in some areas than the Kimber 8TC in my system. Why I used this type of construction:
Symmetrical field interactions: By using the braiding technique described, it substantially reduces any asymmetrical field interactions since no pair (or wire) "rides" on either the inside or outside of the cable more than any other pair/wire. Quality materials: Although it would be more ideal to use higher purity oxygen-free copper with long grain structure (or better yet OCC copper), the solid bare copper in the Cat5 should be sufficient for our purpose of making an inexpensive DIY speaker cable which WILL rival many higher priced commercial cables. The fluorpolymer (FEP) insulation has a low dielectric coefficient and is considered to be one of the best dielectrics available. I would like to thank Jon Risch, who has also done extensive research in the area of sonic attributes of different cable materials, and has proven to be a valuable reference throughout my early cable projects. Individually insulated 24 ga. conductors: "Skin-effect" should be negligible through 20 Khz, due to the 24 ga. conductor size. I am not a fan of stranded copper cable, whenever possible, due to the oxidation that may up between strands. Copper oxide is a semi-conductor, and may adversely affect the signal quality. For this reason, individually insulated conductors are ideal. Caution: Although
this cable has a low inductance design, its capacitance is relatively high
(falls between other highish capacitance cables such as Kimber 8TC and Goertz).
While the high capacitance is virtually a non-factor as far as sonics go,
it MAY be a problem for unstable amplifiers and cause them to oscillate.
This can be mitigated by NOT using very long lengths of cable (>8 ft.),
and making sure your amp isn't one of the few that are unstable into highly
capacitance loads. Most modern properly designed amplifiers should not
have a problem. Check with the manufacturer, if you are in doubt, or construct a Zobel network for your speakers (see links to discussions below). Bi-wiring with 2 separate runs of this 10 ga. equivalent
cable is also not encouraged, if you suspect your amp does not operate well into highly
capacitive loads. For those who want to bi-wire, I would suggest using
the full blown 27 pair version for the low-end (10 ga.), and 9 pairs (Three,
3 pair braids braided) for the high-end (15 ga.). Also, do not automatically assume that bi-wiring is better. See this article on advantages and disadvantages of biwiring As a rule of thumb, it
is generally better to keep speaker cables AS SHORT AS POSSIBLE, even if
it means using longer interconnects. If you encounter a problem with your
amp oscillating, or it shuts down at higher volumes, here are discussions on possible remedies (Zobel networks): Materials Source: Anixter, or www.meci.com
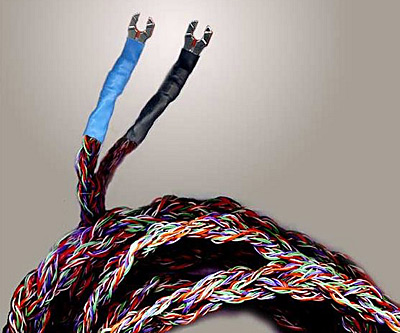
Construction: Cut 14 pieces of the Cat 5 to a length of 6 ft. (I needed about 5- 5 1/2 feet, and allowed for some "shrinkage" of length, due to braiding). Remove the blue PVC jacket (you may have to do it a foot at a time), and remove the twisted pairs. A good trick to remove the jacket is to use the fiber "rip-cord", which you will find within the PVC jacket along with the wires. Simply secure the cable at one end and pull the rip-cord through the PVC, and you should be in business. LEAVE THE PAIRS TWISTED. You should now have 56 pairs (112 wires) of wire. You will NOT need 2 of the 56 twisted pairs (this project only needs 54 pairs). Next comes the fun, and time consuming part. Take three twisted pairs and secure with a bench vise or any other method to provide tension on one end of the cable. I actually used a heavy duty staple gun and stapled the 3 pairs to a vertical wooden door jamb (yeah, I was single at the time :-)). Next, braid the 3 twisted pairs starting with the left pair placed between the center and right pair, and then the right pair placed between the left and center pair, Continue back and forth until you have completed the entire length. Try to braid them as tight as reasonably possible in order to yield the lowest possible inductance. DO NOT go overboard with the tightness on these initial braids- I found that there should be about a 1/16" gap (at its widest) between twisted pairs. A good idea would be to practice on a short length first to get your technique "down". Be CONSISTENT with your braids, and DON'T braid too TIGHTLY!!! I REPEAT DO NOT BRAID TOO TIGHTLY!!! You do not have to braid the last 5 inches or so, as you will need to seperate the pairs and strip the ends of the wire later on, and need to have these "pigtails" to span the distance between binding posts. Start the next batch of three twisted pairs and continue until all the wire has been braided. You should now have 18 braids containing 3 twisted pairs each (6 wires). Now take three lengths of your braided beauties, and, well, you know the drill, braid THEM together reasonably tightly . Now you should have 6 braided lengths containing 9 twisted pairs (18 wires). You now should be an expert at braiding, and will welcome the fact that you have only 2 more braids to do. Next, (you guessed it) take 3 of the 6 lengths and braid those together. Now braid the last three together. You should now have 2 lengths of 27 twisted pairs of wire (54 wires). One length is for your right speaker channel, and the other it for your left speaker channel. Your next step will also be time consuming, and an absolute BEAR on your fingers, but trust me, it will be well worth it: Each twisted pair within each braid will have one solid color-coded wire, and one "striped" or clear color-coded wire. Separate and group together all of the solid wires and then do the same for the striped wires. With the data-twist cable that has bonded pairs, a utility knife or razor blade will be needed to start the sepration of the pairs. You may have differences in the lengths of these wires- just go ahead and cut them so their are all about the same length (the ends of the wires all match up). Now strip about 1" of insulation from the ends of all the solid wires and then twist them all together tightly. Do the same for the striped wires, and then continue with the other ends of your cables. At this point all you need to do is check to make sure you REALLY have all the solids with solids and striped with striped by checking with a multi-meter or continuity tester. This is mandatory! If you don't check it with a multi-meter you may ruin your equipment if one of your pairs is mixed up, causing a short. BE CAREFUL! Now all you have to do to complete your speaker cables is to terminate them with good spades or bananas, like those from WBT, Furutech or Eichmann. Make sure that you note whether the solids or striped wires are positive polarity and and be consistent with your other cable channel or you will have your speakers running out of phase with each other. This will be easy to hear, because you bass response will suffer dramatically. That's it, you're all done. You now have very low inductance speaker cables that are equivalent to 10 ga.!!! It took me an entire weekend to construct these cables, but they're worth it. Give them a while to break-in before giving a seriously critical listen, though. They age nicely. Although I now use a new DIY speaker cable in my current system, the CAT 5 cables described above were among the best speaker cables I ever used. They bested Kimber 8TC, AQ Midnight, and even gave the expensive XLO's a run for their money (the XLO's were better, but not by the margin that the price would indicate). Good listening! Chris VenHaus Read reviews
and comments on this cable: Click
here
Legal Stuff: |